
How to install a CD-ROM drive
Click on the hyperlink for instructions for that step.
Read the Safety Procedures. Very Important!!!
Remove drive from system (this is only if you are replacing a drive)
(I refer to the drive as a CD-ROM but it may be a DVD, DVDRW, CDRW or other type of drive. They all are installed the same way)
- Disconnect all cables in the back of the system (Including power cord)
- With power cord removed, push the power button for five seconds (still leaving power cord disconnected)
- Touch something metal on the system.
- Do not blow on the inside of the system. Your breath has moisture and electronics does not like moisture.
- Open the system (This hyperlink will show you a few examples, however there is too many different type of cases to show here)
- locate the bay that has the CD-ROM.
 |
 |
- Some bays use clips to connect the drive in the bay, others use screws. (Check your manual myself, or manufacturer for instructions)
- Disconnect motherboard data connections
- IDE drives
-
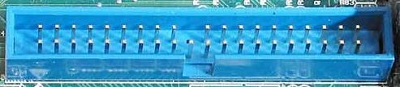
On the motherboard there are two controller connectors. CD-ROM drives usually get plugged into the second controller usually called IDE2 (Some motherboards may only have one IDE port. Consult the manual, myself, or manufacturer for the exact location due to all motherboards are designed different)
- IDE port 0 or IDE1 - is usually blue (not always the case) and it usually gets used for the hard drive.
- IDE Port 1 or IDE2 - is usually white (not always the case) and it usually gets used by the CD-ROM, Zip drive or other devices
-
- IDE drives
 |
- SATA
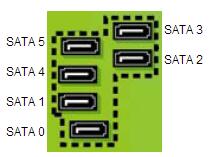
- On the motherboard there can be two or more connectors for the SATA. Usually the first SATA connector is blue (not always the case) and the others are black. The motherboard may have them numbered as well. This determines what drive is the master and slave. Below is an example of a motherboard that has 6 SATA connections (the number of connectors depends on the motherboard you are using. Some can have only 2 and some can have more than 6)
 |
- disconnect data cable to drive
- IDE drive
- If the drive you are uninstalling is the primary drive, disconnect the drive from the end of the data cable.
- If the drive you are uninstalling is be the secondary drive, disconnect it from the middle connector on the data cable.
- SATA
- You can only connect one drive per cable.
- SATA data cable is just pushed in. Pull the cable off motherboard
- IDE drive
- disconnect power connector
- If you are not installing a replacement drive but leaving the bay open, place a filler cap there to cover the hole and keep the dust out and close the computer up, connect keyboard, mouse, monitor and power to the system.
- If you are installing another drive in the same slot, go to Install drive from system below
- Boot to the BIOS and make sure it is seen in the BIOS.
(I refer to the drive as a CD-ROM but it may be a DVD, DVDRW, CDRW or other type of drive. They all are installed the same way)
- Disconnect all cables in the back of the system (Including power cord)
- With power cord removed, push the power button for five seconds (still leaving power cord disconnected)
- Touch something metal on the system.
- Do not blow on the inside of the system. Your breath has moisture and electronics does not like moisture.
- Open the system (This hyperlink will show you a few examples, however there is too many different type of cases to show here)
- locate the bay that is you want the CD-ROM to go in.
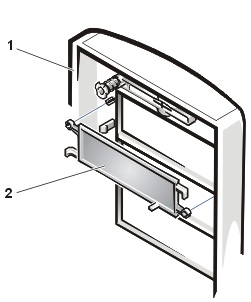
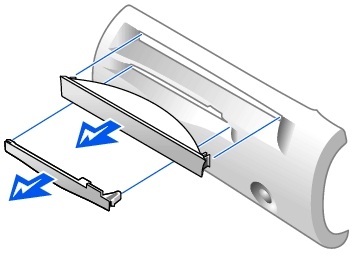
- If you are installing it in a slot that doesn't have an existing drive, you will need to remove the cover. (below is only an example, there is more different types of front panels and covers)
|
|
|
|
- If you are installing it in a slot that an existing drive is in, then remove the old one and insert the new one.
- Some bays use clips to connect the drive in the bay, others use screws. (Check your manual myself, or manufacturer for instructions)
- Check the jumper setting. There is three settings on the drive. MA - Master SL - Slave CS Cable Select Most systems accept Cable Select and if your system accepts Cable Select then set all drives to Cable Select. If your system doesn't allow Cable Select, set the primary drive to master and the secondary to slave (if you have a second drive).
NOTE: if this is a SATA drive, there will not be any jumpers. Also if it is a SATA drive, there will only be one connector on the cable. To determine if it is a SATA or IDE click here.
- Motherboard data connections
- IDE drives
-
On the motherboard there are two controller connectors. CD-ROM drives usually get plugged into the second controller usually called IDE2 (Some motherboards may only have one IDE port. Consult the manual, myself, or manufacturer for the exact location due to all motherboards are designed different)
- IDE port 0 or IDE1 - is usually blue (not always the case) and it usually gets used for the hard drive.
- IDE Port 1 or IDE2- is usually white (not always the case) and it usually gets used by the CD-ROM, Zip drive or other devices
-
- IDE drives
|
|
- SATA
- On the motherboard there can be two or more connectors for the SATA. Usually the first SATA connector is blue (not always the case) and the others are black. The motherboard may have them numbered as well. This determines what drive is the master and slave. Below is an example of a motherboard that has 6 SATA connections (the number of connectors depends on the motherboard you are using. Some can have only 2 and some can have more than 6)
|
|
- Connect data cable to drive
- IDE drive
- If the drive you are installing is the primary drive, connect the drive to the end of the data cable.
- If the drive you are installing is going to be the secondary drive, connect it to the middle connector on the data cable.
- SATA
- You can only connect one drive per cable.
- SATA data cable will only connect in one direction
- IDE drive
-
Install power connector (It is designed to go in only one way and make sure it is seated good)
- Close the computer up, connect keyboard, mouse, monitor and power to the system.
- Boot to the BIOS and make sure it is seen in the BIOS.
Many CD-ROM drives have audio ports to connect audio into. These ports are not needed any longer and can be ignored on most systems. Some older ones may still require them to be used. The newer systems do the audio through the data cable.
You should check the firmware version on the drive with the manufacturers website to make sure it is up to date. If you do not, the drive may not recognize some media. NOTE: If you do need to flash the drive, be sure to follow the steps correctly. If the flash fails or if you do it wrong, it can damage the drive and make it unusable.