
Create an input mask
Microsoft Access
Click the item
You can use input masks with fields that are set to the Text, Number (except ReplicationID), Currency, and Date/Time data types.
Note: If you use an input mask for a Date/Time field, the Date Picker control becomes unavailable for that field.
-
In the Navigation Pane, right-click the table and click Design View on the shortcut menu.
-
Click the field where you want to add the input mask.
-
Under Field Properties, on the General tab, click the Input Mask property box.
-
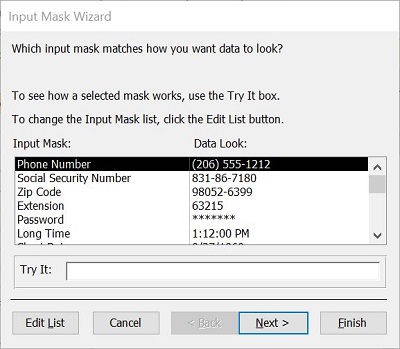
Click the Build button to start the Input Mask Wizard
 |
-
In the Input Mask list, select the type of mask that you want to add.
 |
-
Click Try it and enter data to test how the mask displays.
-
To keep the input mask without any changes, click Next.
-
Select an option for how you want the data to be stored.
-
Click Finish and save your changes.
Add an input mask to a query
-
In the Navigation Pane, right-click the query that you want to change and click Design View on the shortcut menu.
-
In the query design grid, place the pointer in the column for the field you want to change.
You can place the cursor in any row for that field.
-
Press F4 to open the property sheet for the field.
-
Under Field Properties, on the General tab, click the Input Mask property box.
-
Click the Build button to start the Input Mask Wizard, and then follow the instructions in the wizard.
|
|
Add an input mask to a form or report control
-
In the Navigation Pane, right-click the form or report that you want to change and click Design View on the shortcut menu.
-
Right-click the control that you want to change, and then click Properties on the shortcut menu.
-
On the All tab, click the Input Mask property box.
-
Click the Build button to start the Input Mask Wizard, and then follow the instructions in the wizard.
|
|
Create custom input masks
While the Input Mask Wizard provides input masks for most common formatting needs, you may sometimes want to customize input masks to better suit your needs. Input masks can be customized by either changing the predefined masks from the Input Mask Wizard or by manually changing the Input Mask property for a field where you want the mask applied.
-
Open the object in Design View, and click the field where you want to add the custom input mask.
-
Click the build to start the Input Mask wizard.
|
|
-
Click Edit List.
-
Enter a new description in the Description text box using characters and placeholders from the table.
-
Click the Mask Type down arrow and select a suitable mask type.
-
click Close. The new input mask displays in the list.
Customize input masks from the field property setting
-
In the Navigation Pane, right-click the object and click Design View on the shortcut menu.
-
Click the field where you want to create the custom input mask.
-
In the Field Properties area, click the Input Mask text box, and then type your custom mask.
-
Press CTRL+S to save your changes
For more information abut how to define an input mask, click the Input Mask property box, and then press F1. You must manually type the input mask definition for Number and Currency fields.