Clean install of
Vista
This is from Paul Thurrott's Supersite pasted here to avoid
broken links. To see it from his site,
click here
Click here for information on different ways to store your personal
files on your hard drive. This will make backing up your files
easier.
To boot to the CD you will
need to set the BIOS to boot to the CD-ROM first.
Click here on information about booting to the BIOS.
OS
install issues - Known issues that can prevent windows from
installing (These issues do not always apply
but if you have a problem during install, check these out)
***NOTE*** If you have a zip drive, flash card reader,
printer, or other non required items, you will need to disconnect it
from the system before doing the install of windows. If the zip,
flash card reader or printer is connected, the windows installation
will make the zip drive, flash card reader, or printer drive C
and assign the hard drive with a different letter. Some programs
will not install unless the hard drive is drive C. You can connect
the zip drive once windows is loaded. It is good practice to
disconnect all unnecessary devices before the install.
***NOTE***If you have a second hard drive, Physically
disconnect it until after the reinstall and then
install the second hard drive.
If you don't want to have
to re-activate windows after the re-install, copy the wpa.dbl file
to a disk. After reinstall, copy the file back to the
Windows\system32 folder.
- It is recommended that
you disconnect all peripheral devices except the keyboard,
mouse, and monitor prior to reinstalling the operating system.
Peripheral devices may include printers, scanners, zip drives,
external modems, or USB hubs. If you have installed additional
expansion cards, such as SCSI adapters or IO cards, it is also
recommends that you remove these extra cards prior to
reinstalling the operating system in order to avoid possible
errors or resource conflicts.
- If you are using a
Windows Vista Upgrade CD to install windows, you will need the CD
of a previous version of windows. During the install, it will
ask you for the CD to verify you qualify for the upgrade.
- If you are creating a
Raid install (where you use two or more disks as one disk), you
will need to consult the manufacturer of the raid that is on
your motherboard or pc card for instructions on setting up raid.
With raid there is an additional step you have to do at the
beginning of windows install. The instructions vary depending on
the model of the raid.
You will need
- Microsoft Windows Vista
CD
- Previous Windows CD (if
you are doing an upgrade)
- Driver disks
- Additional driver and
utility diskettes or CDs
- Download Delpart.exe (Optional)
Click here to download the file.
Delpart.exe and
the debug script does the same thing. They both delete the
partition. Delpart.exe is quicker and easier to use than the debug
script. You can also have the windows CD delete the partition.
NOTICE: The procedures below require a
repartitioning and reformatting of the hard drive. This will
permanently erase all data on the drive. Please back up any data you
wish to preserve before performing these procedures. During the
procedure it will ask you for the product key. Have it handy to
enter when it requests it. Some installs vary to a certain degree
but all of them follow the following steps enough to be able to use
this layout for all of them.
For instructions on installing windows, follow these steps
- If you have a blank
drive or the partition has already been deleted, go to step 4.
- You have two options
to choose from to delete the partition. You can use Delpart or
you can use the windows CD. If you want to use Delpart, go to
step 3. If you want to use the windows CD go to step 4
-
To delete the partition using delpart.exe, click here. (This
link will open to a separate window leaving this one open. When
you are finished running delpart, you will need to return to
this page, and resume at step 4) or you can use the
windows feature to delete the partition. If you want to use the
windows, skip this step and go to step 4 (I
strongly recommend using the Delpart. It does a better job)
- Put your windows
Installation DVD in the drive
- Reboot the computer
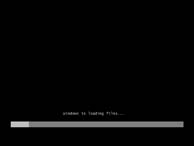
- The PC will launch into Setup and display a
black text-based screen with the message "Windows is loading
files..." After that you will see the Vista boot screen and the
screen will move into the initial phase of Setup. (Click
on the image to see a bigger picture of this)
| |
 |
|
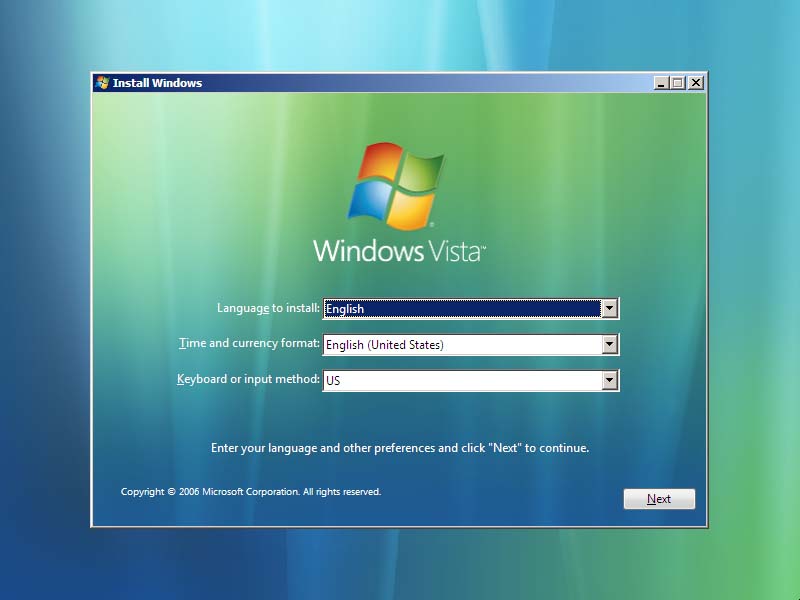
- Choose your language, time and currency
formats, and keyboard or input method
- For most people the default values will
already be correct, but make any needed changes and click
Next to continue. (Click
on the image to see a bigger picture of this)
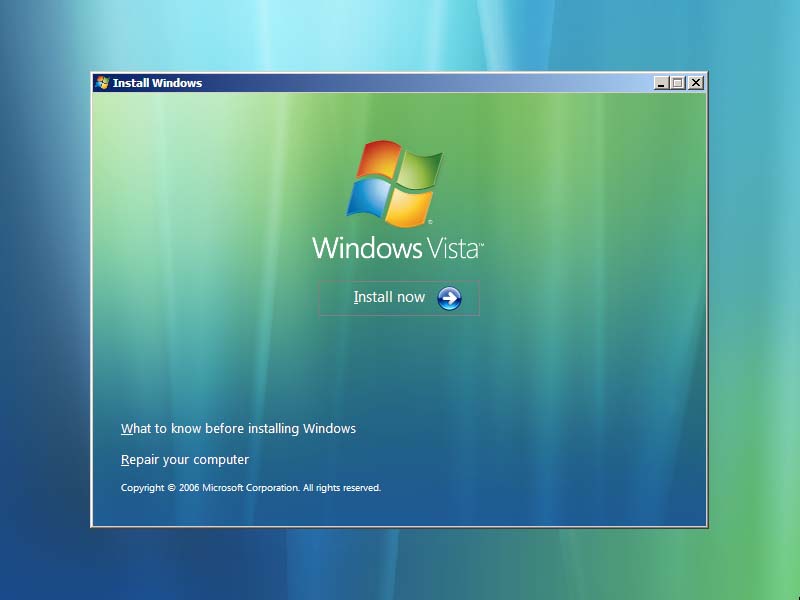
- Install or repair Windows Vista
- In this phase of Setup, you can choose
between installing the OS ("Install now") or repairing a
problematic, perhaps non-booting, Vista install ("Repair
your computer").
- Click "Install now"
to continue (Click on the image to
see a bigger picture of this)
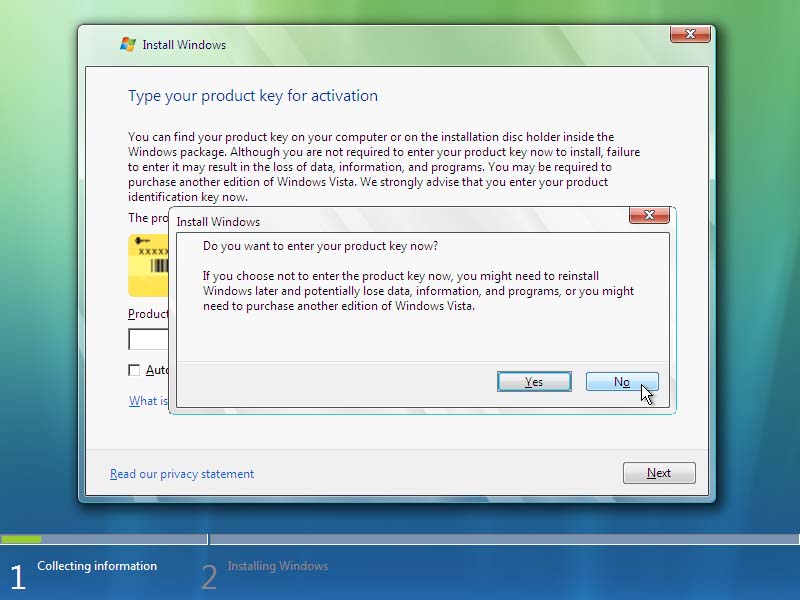
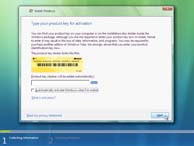
- Type your product key for activation ... or
don't
- After a brief pause, a screen appears in
which you can optionally enter your product key and choose
to have Windows automatically activate the OS installation (i.e.
tie the product key to this hardware configuration).
Do not type in your product key and do not let Windows
automatically activation the install. (Click
on the image to see a bigger picture of this)
| |
 |
|
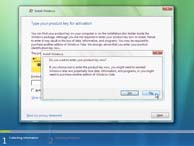
- Here is why
- In the event that something goes wrong
down the road, you might not want to automatically tie the
only product key you received with this particular PC.
Instead, you can enter this information later.
- Leave the product key field blank and
uncheck the item titled "Automatically activate
Windows when I'm online."
- Click Next to continue
- If you do choose to enter your product
key, Setup will determine the Vista product edition to
install and will not display the next two screens shown here
and therefore skip to step 10.
- Because you have left the product key
field blank, Vista Setup wonders if you're sure about this
decision and asks if you would like to correct your choice
and go back and enter the product key.
- Click No to Continue (Click
on the image to see a bigger picture of this)
| |
 |
|
- Setup now prompts you to select the Vista
version you have purchased.
- Choose the version you purchased (your
product key is tied to the version you bought)
- Check "I have selected the edition of
Windows that I purchased) (Click on the
image to see a bigger picture of this)
- Click Next
- Be careful, there two versions of Vista
Home Basic and Vista Business listed
- The versions with N at the end of their
name are designed for the European Union only and do not
include Windows Media Player 11 so do not choose those.
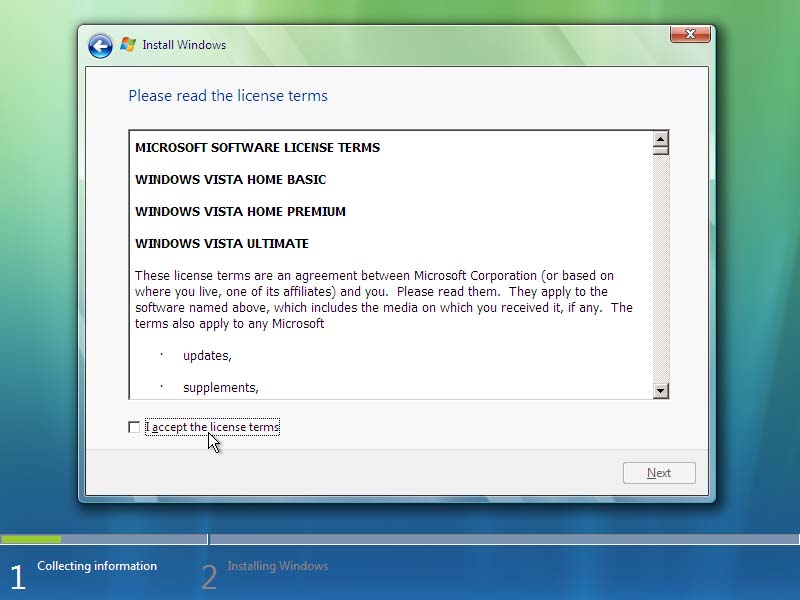
- Agree to the licensing
- You must agree to the Windows Vista End
User License Agreement (EULA)
- Check "I accept the license terms"
- Click Continue (Click
on the image to see a bigger picture of this)
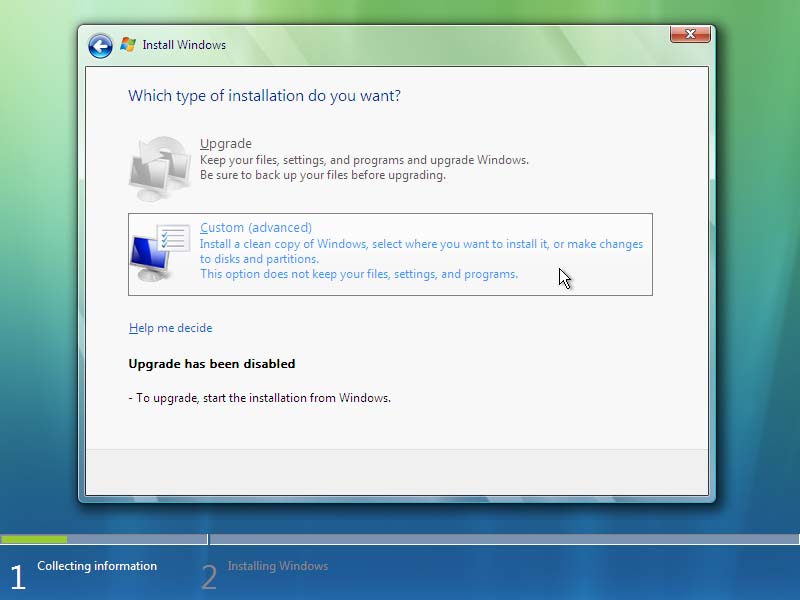
- Choose an installation type
- You have two options
- Upgrade install
- Custom (advanced)
- Click Custom (advanced)
(Click on the image to see a bigger
picture of this)
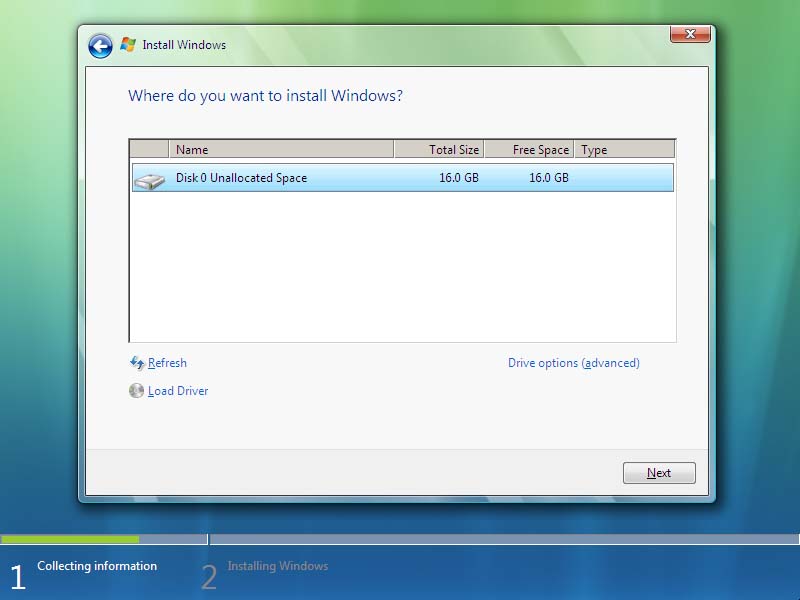
- Where do you want to install Windows? (Click
on the image to see a bigger picture of this)
| |
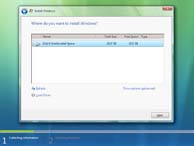 |
|
- You will see a graphical representation of
your PC's hard drive (s). On a new drive you will see the
picture like the following but there is a number of useful
utilities, hidden under the "Drive options (advanced) option.
Here is some of the options
- Refresh - This will refresh the graphical
view of the partitions and disks available to you during
Vista Setup.
- Load Driver - If you are using some kind
of advanced disk controller and, as a result, some disks are
not showing up in Setup, you can use this option to load
drivers now, with the hoe that the disks will become
available to you. For example, some RAID arrays are not
immediately recognizable to Vista Setup.
-
Click Drive options (advanced),
however, and a number of new options appear
- Delete - If you are working with a
hard disk that has multiple partitions and would like to
delete one or more of them, perhaps to later create a
single partition (using New, discussed below), you can
use the Delete option. Delete removes the partition and
marks the space occupied by that partition as free and
empty.
- Format - On a hard disk with existing
partition(s), you can use the Format command to wipe out
any data contained on those partitions and return them
to like-new, pristine condition. Note that formatted
disks are essentially empty and that Windows Vista Setup
does not require you to explicitly format a partition
before installation: If you choose an empty partition,
Vista Setup will automatically format the disk for you.
- New - On a hard disk with no
configured partitions (i.e. a "clean" or empty disk),
you can click this option to create a new partition.
This partition can be sized up to the physical capacity
of the underlying drive (and is by default), but you can
optionally choose to leave some empty space for later
partition creation and formatting. (Windows Vista
includes tools for this purpose.) In general, I
recommend simply creating a partition that is the same
size as the underlying disk, formatting it, and
installing Vista.
- Extend - If you are working with a
hard disk that a partition and some empty hard disk
space, and would like to extend that partition so that
it now includes some or all of the empty space,
you can use the Extend command. Note that the empty
space must be available logically "behind" the
currently=selected partition for this command to work.
You do not have to take all the available space: Setup
will allow you to pick how much you would like to add to
the existing partition.
- Note: Windows Vista Setup will
only create NTFS partitions (Click
on the image to see a bigger picture of this)
| |
 |
|
-
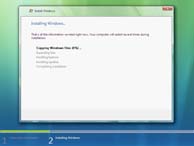
Installing Windows
- Setup will start the process of installing
the operating system on your PC. This is a multi-step process
that does the following steps
- Copying Windows files - In this phase, the
Vista image (install.wim) file is copied to the PC's hard disk.
- Expanding files - Here, the image file is
expanded into the core Vista install, a bare bones version of
the OS that will work on virtually any PC.
- Installing features - This phase passes
very quickly because a stock Vista install doesn't have "features
"to
configure.
- Installing updates - Here, Setup attempts
to install any service packs or hot-fixes that you have
added to the installation media
- After this, Setup reboots the PC. You
will see the "Windows is loading files" and standard boot
screens, and then Setup will move into a text-like screen
that says, "Please wait a moment while Windows prepares to
start for the first time:.
- Completing installation. Here, a basic set of
hardware drivers for your particular PC are installed. Once this
step completes, the PC reboots again.
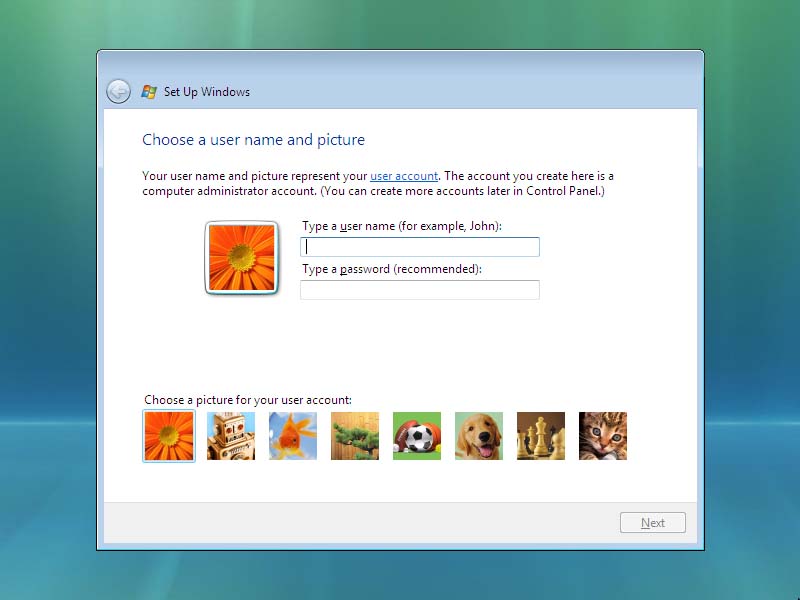
- Set up Windows
- Choose a user name and picture
- You will create the following
- User name
- Password
- Not required but security will be less
- You will be required to type in the
password a second time for verification
- Password hint
- Picture
- Picture is not required, if you do not
select one, Windows will select one for you (Click
on the image to see a bigger picture of this)
| |
 |
|
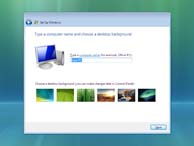
- Type a computer named and choose a
desktop background
- Enter a name for your PC
- Choose a background wallpaper (Click
on the image to see a bigger picture of this)
| |
 |
|
- Click Continue
- Help protect Windows automatically
- Choose whether Windows will automatically
protect your PC against electronic attacks. When you
choose "Use recommended settings." the following changes are
made to your Vista install
- The Windows Automatic Updating service
runs in the background and periodically polls the Microsoft
Update Web service to determine whether there are any
security updates available for your system. When there are,
these updates are downloaded and installed automatically.
- The Windows Defender anti-spyware
solution which is built into Windows Vista is enabled and
kept up to date with software updates and spyware
definitions. Furthermore, your system is joined to the
Microsoft SpyNet service, so that it automatically provides
SpyNet with any unique spyware information, allowing you to
ano9nymously and silently participate in the worldwide
battle against malicious software.
- Any software errors or other problems
that occur on your PC are transmitted to Microsoft via the
Microsoft Error Reporting service, allowing the software
giant to examine these problems and then provide you with
solutions.
- When new drivers become available for
your particular hardware configuration, they will be
automatically downloaded and installed.
- The internet Explorer (IE) 7 Phishing
Filter, which helps protect you against Web0based identity
theft scams, is enabled, further enhancing the security of
Microsoft's latest Web browser.
- Optionally, you can also choose between
"Install important updates only" where only critical
security updates are automatically downloaded and installed,
and "Ask me later," where you essentially put off the
decision about your PC's security to a later time.
- Choose "Use recommended settings" to
continue (Click on the image to see a
bigger picture of this)
| |
 |
|
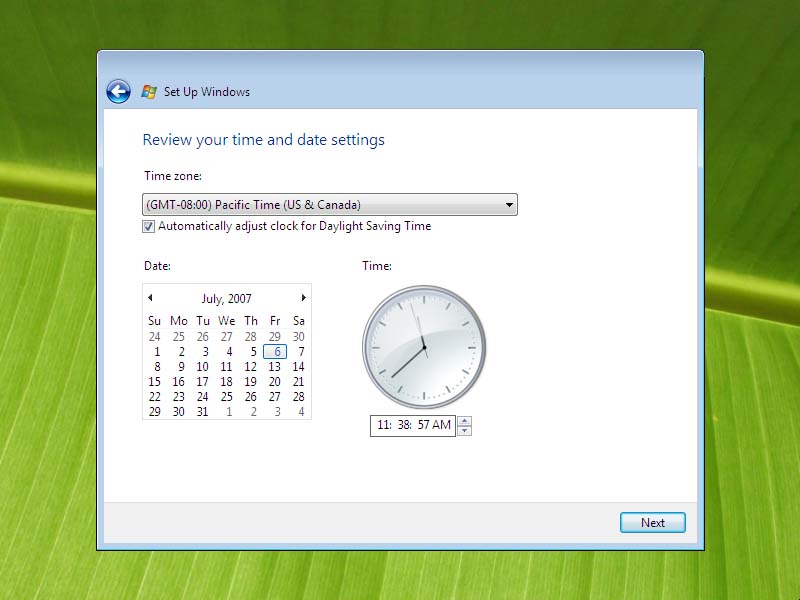
- Review your time and date settings
- Check the settings and set it to match
your area
- Click Next to continue (Click
on the image to see a bigger picture of this)
- Select your computer's current location.
(Click on the image to see a bigger picture
of this)
- The interactive portion of Vista Setup is
complete.
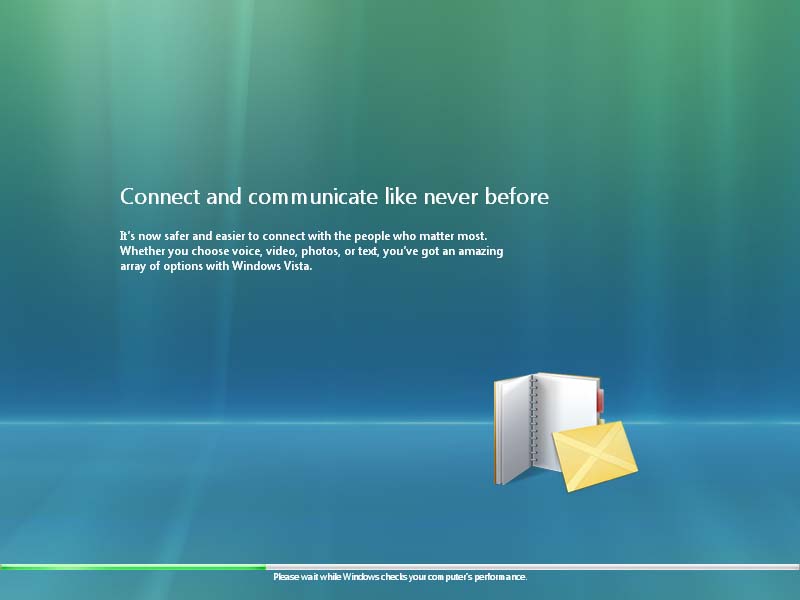
- Click Start
- Please wait while Windows checks your
computer's performance. (Click on the
image to see a bigger picture of this)
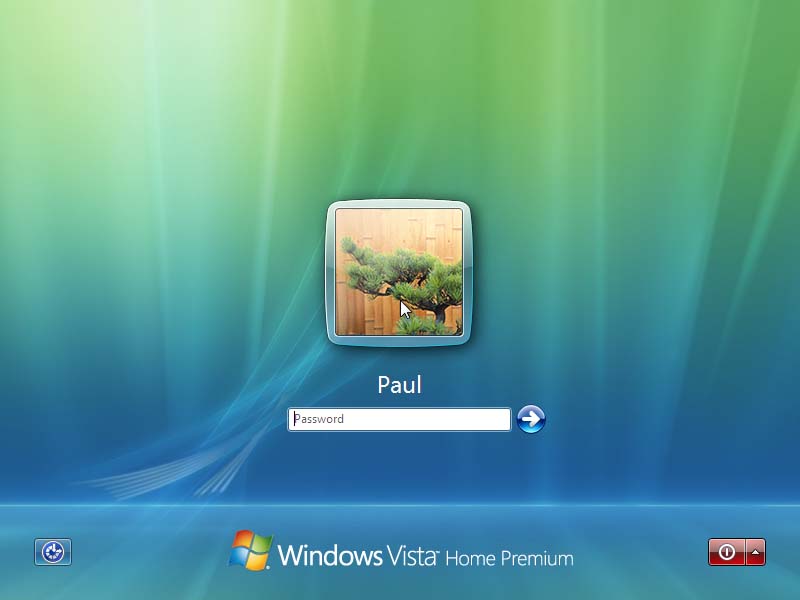
- Initial logon (Click on
the image to see a bigger picture of this)
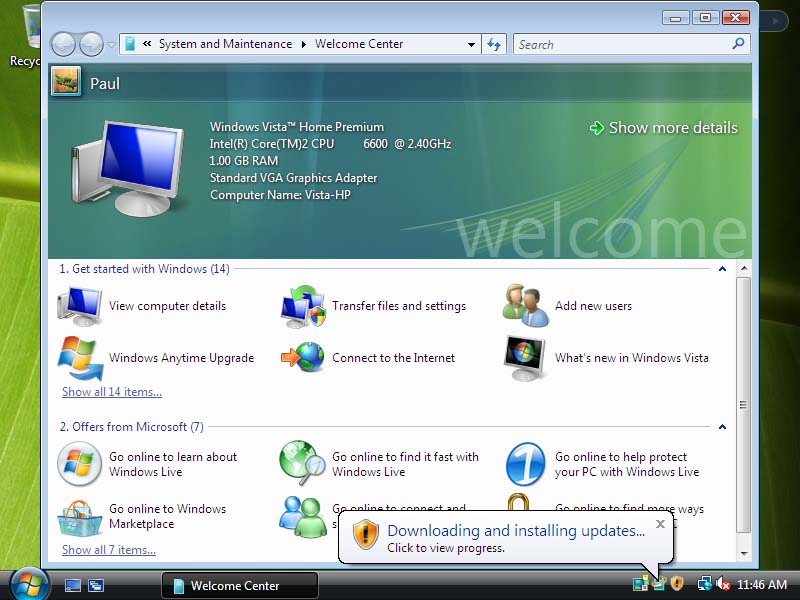
- Your now on the desktop (Click
on the image to see a bigger picture of this)
Note:
Some systems require the chipset to be loaded. The chipset has to be
the first thing installed after windows install or the windows
install will get corrupted. Because of the number of different types
of systems out there, I have no way of knowing what chipset you
have. You will need to consult the manual for your system or contact
the computer manufacturer on getting the information on what chipset
you have. You can E-mail me information about your system and I will
be glad to inform you of the steps to load your chipset. You may
also have other drivers that you will need to load.
Information about loading drivers click here
Click here if windows will not install
Click here if you are getting No drive found message
|
|