How to use XPS Viewer
Windows 10
 |
This information is from Microsoft, click here to see it from Microsoft
For assistance with accessing XPS Viewer, click
hereThis is Microsoft's version of PDF.
An XPS document is any file that is saved to the XML Paper Specification, or .xps, file format. You can create XPS documents (.xps files) by using any program that you can print from in Windows; however, you can view XPS documents only by using the XPS Viewer, which is included in this version of Windows.
What is the XPS Viewer?
When you click an XPS document, it will open automatically in the XPS Viewer. There are several options for viewing and managing XPS documents in the XPS Viewer, including:
- Saving a copy of an XPS document to
your computer
- Searching the document for a word or
phrase
- Zooming in or out to make text and
pictures easier to read
- Digitally signing the XPS document
- Determining who can access the
document and for how long by applying document permissions
For more information about the XPS document format, see XML Paper Specification (http://go.microsoft.com/fwlink/?LinkId=62045) on the Microsoft Web site.
Using the XPS Viewer
XPS Viewer is a program you can use to view, search, set permissions for, and digitally sign XPS documents. To begin using the XPS Viewer, open an XPS document. The following table describes toolbar buttons available in XPS Viewer.
Toolbar buttons in the XPS Viewer
| Toolbar button | Description | ||
|---|---|---|---|
|
File |
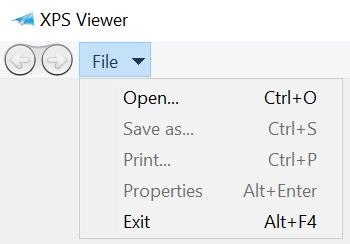
Open an XPS document in the viewer, save a copy of a document, or exit the viewer. You can also view document information, like the author or creation date. |
||
|
Permissions |
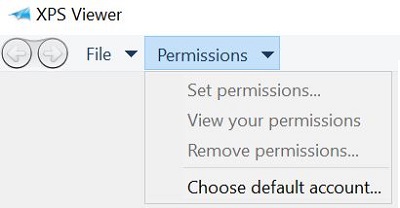
Set, make changes to, and view document permissions. You can also select the account you want to use for permissions. If you're the document author, you can set or make changes to document permissions. If you're not the document author, you can see which document permissions you have. |
||
|
Signatures |
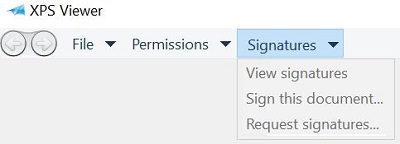
Digitally sign the document, request signatures from other people, and view digital signatures that have already been applied to the document. |
||
|
Contents |
View an outline of the document on the Contents pane.
|
||
|
|
Print an XPS document. If permissions have been applied to the document, make sure you have print permissions before you try to print it. |
||
|
Find box |
Search the document for a word or phrase. The search results will appear in the Contents pane. |
XPS documents: frequently asked questions
Here are answers to some common questions about XPS documents.
What is an XPS document?
An XML Paper Specification (XPS) document is a document format you can use to view, save, share, digitally sign, and protect your document’s content. An XPS document is like to an electronic sheet of paper: You can’t change the content on a piece of paper after you print it, and you can’t edit the contents of an XPS document after you save it in the XPS format. In this version of Windows, you can create an XPS document in any program you can print from, but you can only view, sign, and set permissions for XPS documents in the XPS Viewer.
How do I create an XPS document?
You can create an XPS document in any program you can print from, including the entire Microsoft Office system. To learn how to create an XPS document in Microsoft Office, go to the Microsoft Office Help and How-to Web site and search for information about how to save a file in XPS format.
-
Click the File menu, and then click Print.
-
In the Print dialog box, select Microsoft XPS Document Writer from the list of available printers, and then click Print.
-
In the Save the file as dialog box, name your XPS document, and then click Save.
How do I view an XPS document?
While you can create an XPS document in any program you can print from, you can only view, digitally sign, or set permissions for an XPS document in the XPS Viewer, which is included in Windows Server® 2008 R2.
Double-click an XPS document to view it in the XPS Viewer; the document opens in the viewer automatically. To learn more about the toolbars and features in the XPS Viewer, see Using the XPS Viewer.
How can I verify and protect an XPS document?
You can verify an XPS document's authenticity with a digital signature and protect a document's contents with permissions.
A digital signature serves two purposes: It enables you to verify that your XPS document hasn’t been changed since you signed it, and to verify another XPS document’s publisher so you can make sure it comes from a trusted source before you open it.
You can also create permission restrictions for your XPS document so that no one can view, copy, print, or digitally sign your document without your permission. You can set time restrictions on permissions, allow as many or as few permissions as you want to other users, and allow different users to have different levels of access.
There is three tabs of options
-
File
 |
-
Permissions
 |
-
Signatures
 |

 Note
Note