
Create a group
To create a group, do the following
-
On the left hand side of Facebook under Groups, click Create Group
|
|
-
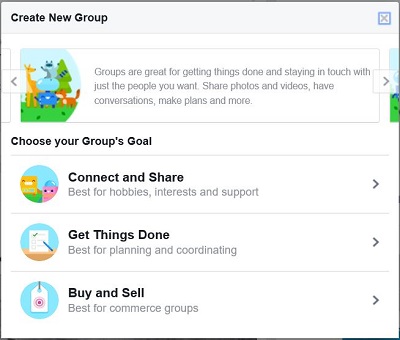
Choose the type of group you want
 |
-
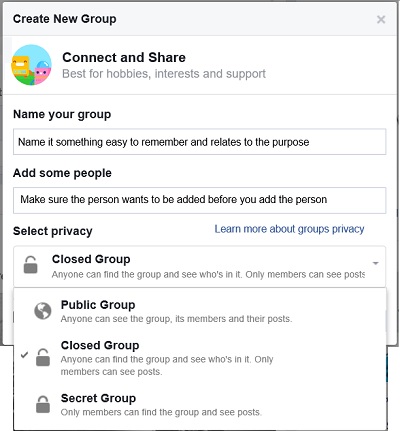
Here you can give your group a name, add people to the group and set privacy
 |
-
Name - Give it a name that relates to the purpose of the group
-
Add people - make sure they want to be added before adding them
-
Set privacy
-
Public - everyone can see the group in searches. They can also see who is a member and read their posts.
-
Closed - You can see who is a member of the group but you cannot read their posts unless you request to join and they accept you. .
-
Secret - You cannot see who is a member of the group unless you join and they accept you.
-
-
Choose Icon then OK
 |
Here is sections of the group that you will need to set according to how you want the group setup (some of it was set up when you created the group but if you want to change the setting you would do it here). (Click the hyperlink for instructions)
-
Group Name and Icon - Name and Icon of group
-
Group Type - Defines the type of group
-
Privacy - If you want the group to be Public, Closed, or Secret
-
Membership Approval - if you want any member to approve or only admins
-
Web and Email Address - allows someone to access the site from any browser and go directly to the group (You may be required to sign in)
-
Description - tells about the group
-
Tags -to make searching for the group more successful
-
Posting Permissions - If you want everyone in the group to post or just admins
-
Post Approval - If you want the Admin or moderator to approve all posts
Tip - Have more than one Admin but be careful about how many you have. The more admins you have can cause conflict of ideas.
Add a photo to the group by clicking Upload Photo or Choose Photo
 |
For more help with Groups, click here